React - Week 1
See the Learning Objectives for this lesson.
Before you start
Before you arrive at class you must have completed the following setup work.
If you are a teacher reading this, please check the Instructor Notes
What is React?
React is a JavaScript library created by Facebook. It is used for making complex, interactive user interfaces. It has become very popular in the last 5 years.
Why has it become so popular?
- It is fast and efficient
- It is easy to understand & less verbose than the "vanilla" JS API
- It helps separate functionality into small, understandable pieces
What is a component?
React heavily relies on a concept called "components". Components are like small Lego blocks for designing and developing user interfaces (UI). They can be stuck together in different ways to create new UI.
Let's have a look at an example: the GitHub header. What are the logical "pieces" of UI? What could be a component?
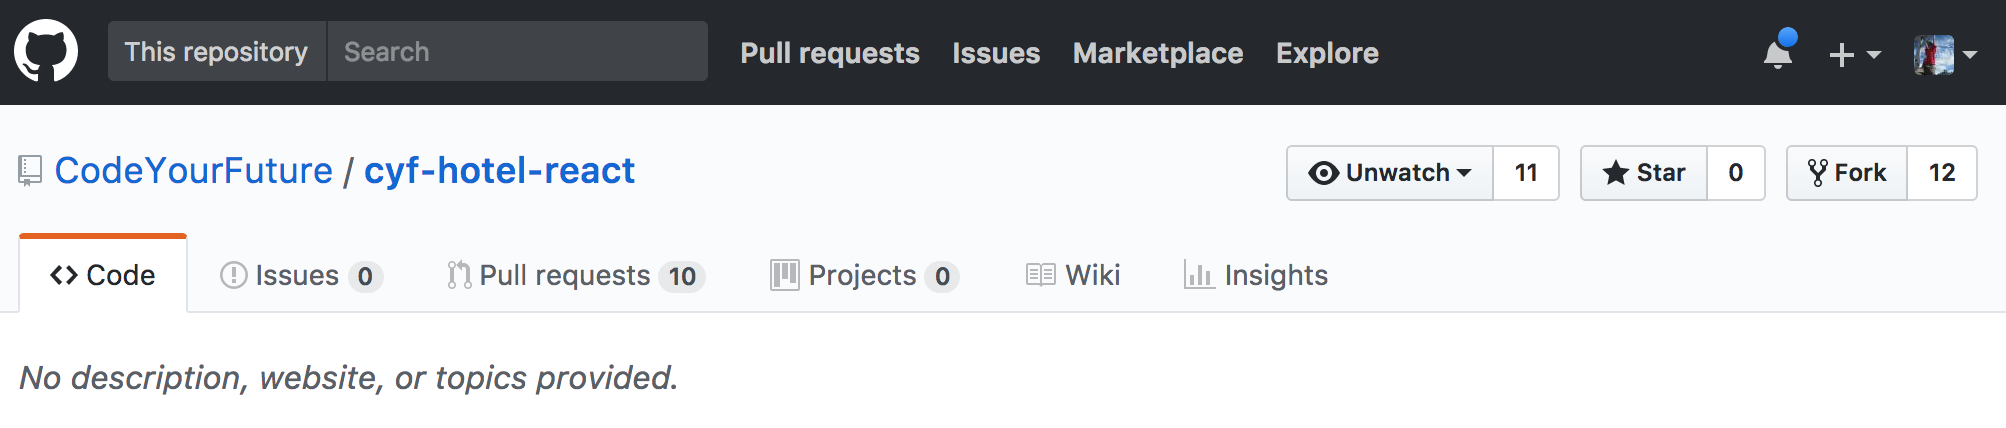
Here we've highlighted some elements that could be components:

Component tips
There are no hard & fast rules for making components. UIs can be split up into components in many different ways, requiring judgement based on your context.
- Components should follow the Single Responsibility Principle
- Each component should only have 1 "responsibility"
- Should only do 1 thing
- Components should have good, explicit names
- This helps you to remember what the component's job is
Exercise A (estimate: 15 min)
- Look at the user interface below:
- Draw boxes around the components and give them names. Compare with the example components shown in the second image.
Rendering with React
Remember how annoying it was to manage the DOM yourself in our previous lesson? The "vanilla" JavaScript APIs for updating the DOM are quite long and difficult to remember. React makes this easier by manipulating each DOM element itself, instead of you doing it manually. You give React a "description" of the DOM that you want and it will update the DOM for you. React abstracts away the management of the DOM.
Let's take a look at an example. We are going to walk through how to render a <div> with the text "Hello World" within it.
How we could do this using "vanilla" JS? (interactive version):
let divNode = document.createElement("div");
divNode.innerText = "Hello World";
Now convert to using React (interactive version):
const element = React.createElement("div", {
  children: "Hello World",
});
JSX
React is already helping us a bit by cleaning up some of the verbose vanilla JS APIs. However in a typical React application you would still use a lot of the React.createElement function. To improve the developer experience the React team developed JSX.
JSX is a syntax sugar that looks like HTML, but is actually converts to the React.createElement function when you run it.
Using JSX (interactive version):
const element = <div>Hello World</div>;
This is much easier to read than both the straight React.createElement API and the vanilla JS API. Most people using React use JSX to write their components.
Exercise B (estimate: 5 min)
Change the JSX example from above to instead render a h1 tag with the text "Hello Code Your Future".
Let's create a React app
Exercise C (should be completed in prep)
If you haven't already, follow the instructions to create a React app called pokedex.
What got created?
Diagram of folder layout created by create-react-app.

React Components
We looked at the beginning of the lesson at the concept of components. Now look at how components are made in React.
import React from "react";
import ReactDOM from "react-dom";

function HelloWorld() {
  return <div>Hello World</div>;
}

ReactDOM.render(<HelloWorld />, document.querySelector("#root"));
There are 3 important parts in this code:
- First we import
React. This is important because JSX is converted toReact.createElementcalls. If theReactvariable is undefined then this will fail. - We create a React component called
HelloWorld. - We render the
HelloWorldcomponent into the element with the id ofroot.
The process of rendering is turning the JSX elements returned by the component function into DOM elements on the screen. This is done by React for you.
Exercise D (estimate: 20 min)
In this exercise we replace the placeholder React app with our own. It should look like this:
Welcome to the Pokedex

Complete the following steps:
- First off, head to the root of your
pokedexrepo and start the app usingnpm start. - In the
pokedexReact app that you just created, open thesrc/App.jsfile. - Delete everything in the file except the line containing
export default App. You should see an error in your terminal and in your web browser - don't panic! We're going to remake theAppcomponent ourselves. - Import the React variable from the React package.
- Create a function named
App, which will be our component. - Within the
Appfunction, return a<h1>element with the text "Welcome to the Pokedex". What do you see in your web browser? - Create a
<div>element that wraps around the<h1>you just created. - Below the
<h1>element (but within the<div>), create an<img>element. Then make itssrcattribute equal tohttps://assets.pokemon.com/assets/cms2/img/pokedex/full/016.png. What do you expect to see in your web browser? - Now create a
<header>element to wrap both the<h1>element and the<img>element.
Component Composition
You can combine a component with another component to render both. This is called composition (interactive example):
function Greeting() {
  return <span>Hello</span>;
}

function Mentor() {
  return <span>Ali</span>;
}

function HelloWorld() {
  return (
    <div>
      <Greeting />
      <Mentor />
    </div>
  );
}
In the HelloWorld component we are using a reference to the Greeting and Mentor components. React reads these references when rendering HelloWorld and so it renders the Greeting and Mentor child components.
We are also using some shorter syntax within the HelloWorld component. <Greeting /> is a shorter way of writing <Greeting></Greeting>, which is useful if we don't need to put anything inside the Greeting component.
Notice how the components that we write (HelloWorld, Greeting, Mentor) are written using a camel case convention and always start with an uppercase letter. And "regular DOM" components (div, span) are always lowercase? This is a convention to let you know whether you are using a "regular DOM component" or a component that you have written. When you're making your own components, you should always start them with an uppercase letter.
Exercise E (estimate: 10 min)
In this exercise, we will split out a new Logo component from the App component. And then we'll add a new BestPokemon component:
Welcome to the Pokedex
My favourite Pokemon is Squirtle
You should complete the following steps:
- In your
pokedexReact app, open thesrc/App.jsfile. - Create a new function named
Logo. - Copy the
<header>element and its contents and paste it into theLogocomponent. - Replace the
<header>element in theAppcomponent with the newLogocomponent. - Create a new component function named
BestPokemonand return a<p>element with some text saying which is your favorite Pokemon (e.g. "My favorite Pokemon is Squirtle"). - Render your new
BestPokemoncomponent below theLogocomponent within theAppcomponent.
Arrow Functions for shorter syntax
Because a React component is a function, we can also use the arrow function syntax:
const HelloWorld = () => {
  return (
    <div>
      <h1>Hello World</h1>
    </div>
  );
};
This can be even shorter again if we use parentheses and implicit return:
const HelloWorld = () => (
  <div>
    <h1>Hello World</h1>
  </div>
);
Although this is shorter, it is less flexible as we cannot insert code that is not JSX. Like for example, a console.log:
// THIS DOES NOT WORK!
const HelloWorld = () => (
  console.log('Hello!');
  <div>
    <h1>Hello World</h1>
  </div>
);
So we will use arrow functions but we should not use the implicit return for now..
Exercise F (estimate: 10 min)
In this exercise, we'll convert the Pokedex app to use arrow functions. It should still look the same in your browser as Exercise E.
- Using the
pokedexReact app that you created earlier, open thesrc/App.jsfile. - Convert the
LogoandBestPokemonfunctions into arrow functions.
Embedding JavaScript into JSX
So far all of the components we have looked at haven't been able to change - they are hard-coded. But this doesn't make very interesting websites. We want to use variables with different data. We can insert variables (and some other things) into our React components.
Anything in the JSX that is inside curly braces {} is interpreted as a regular JavaScript expression. That means you can use every object or function from JavaScript that we have learned so far. Let's look at an example (interactive example):
function Greeting() {
  const greetingWord = "Hello";

  return <span>{greetingWord}</span>;
}
Now instead of hard-coding the greeting in the Greeting component, we are using a variable. Remember that everything between the curly braces is just regular JavaScript. So we can use more than just variables (interactive example):
function Mentor() {
  const mentors = ["Ali", "Kash", "Davide", "German", "Gerald"];
  return <span>{mentors.join(", ")}</span>;
}
Now we have modified the Mentor component to use the Array.join method so that it lists several mentors' names. This works with other JS types:
function Addition() {
  return <span>{1 + 2 + 3}</span>;
}
function Weather() {
  const weatherData = {
    temperature: 5,
    location: "London",
  };

  return (
    <p>
      The temperature in {weatherData.location} is {weatherData.temperature}
    </p>
  );
}
function formatName(user) {
  return user.firstName + " " + user.lastName;
}

function Name() {
  const user = {
    firstName: "Bob",
    lastName: "Marley",
  };
  return <span>{formatName(user)}</span>;
}
A common pattern in React is to use Array.map to loop through a list of items and render a component for each one (interactive example):
const mentors = ["Ali", "Kash", "Davide", "German", "Gerald"];

function MentorsList() {
  return (
    <ul>
      {mentors.map((name) => (
        <li>{name}</li>
      ))}
    </ul>
  );
}
Here we are using Array.map to turn an array of strings into an array of components.
Exercise G (estimate: 20 min)
In this exercise, we'll change the Logo component to use a variable for the app name. Then we'll add a new component CaughtPokemon which displays today's date. And finally we'll make BestPokemon show a list of abilities:
Welcome to CYF's Pokedex
My favourite Pokemon is Squirtle
- Anticipation
- Adaptability
- Run-Away
Caught 0 Pokemon on 11/4/2023
You should then complete the following steps
- Using the
pokedexReact app that you created earlier, open thesrc/App.jsfile. - Inside the
Logocomponent create a new variable calledappNameand assign it to"[YOUR_NAME]'s Pokedex". - Now replace the hard-coded app name with
{appName}. What do you see in your web browser? What would you do if you wanted to change the app name? - Create a new component named
CaughtPokemon. Within this component return a<p>tag with the text "Caught 0 Pokemon on" (we're going to fill in today's date in the next step). - Create a variable named
datewithin theCaughtPokemoncomponent, and assign it today's date (hint:new Date().toLocaleDateString()). Finally, render thedatevariable after the text "Caught 0 Pokemon on". - Render the
CaughtPokemoncomponent within theAppcomponent (belowBestPokemon). - Within the
BestPokemoncomponent, create a variable namedabilitiesand assign it to an array with some Pokemon abilities (e.g.['Anticipation', 'Adaptability', 'Run-Away']). - Change the
BestPokemoncomponent to return a<div>element with the existing<p>element inside it. Then add a<ul>element underneath the<p>element. - Now use the
.map()method on theabilitiesvariable to loop over each name and return a<li>element for each (hint: look at the mentors list example above) within the<ul>element.
Keys
You may have noticed that we are now seeing a red error message in the Dev Tools: Warning: Each child in a list should have a unique "key" prop.. This error happens when you use Array.map to return a list of elements (interactive example):
const mentors = ["Ali", "Sub", "Loic", "Anthony", "Lucy", "Mozart"];

function MentorsList() {
  return (
    <ul>
      {mentors.map((name, index) => (
        <li key={index}>{name}</li>
      ))}
    </ul>
  );
}
Here we have added a key prop to the li element. The key prop has a special meaning in React. React uses key to keep track of each element in the list.
The React documentation and React learning book explain this in more depth.
Importing/Exporting Components
Organise your code by importing and exporting components. This works in the same way as regular JavaScript import and exports. (interactive example):
import Greeting from "./Greeting";
import Mentor from "./Mentor";

function HelloMentor() {
  return (
    <div>
      <Greeting />
      <Mentor />
    </div>
  );
}
We need to export our components to use them in other files:
function Greeting() {
  return <span>Hello</span>;
}

export default Greeting;
Name component files exactly the same as the component (including the capital letter). Do this every time.
Exercise H (estimate: 10 min)
In this exercise, we'll split the Pokedex app into separate files. It should still look the same in your browser as Exercise G.
- Open the
pokedexReact app that you created earlier. - Create a new file within the
srcdirectory namedLogo.js. - Copy and paste the
Logocomponent fromApp.jsintoLogo.js. - Remember to add
import React from 'react'at the top ofLogo.js. - Export the
Logocomponent fromLogo.js(hint: look at theGreetingexample above). - Delete the old
Logocomponent fromApp.js. - Import the
Logocomponent intoApp.js(hint: look at theHelloMentorexample above). - Repeat this process with the
BestPokemonandCaughtPokemoncomponents. What do you think the files should be called?
Making an argument for Props
What's the problem with our HelloMentor component above?
The component HelloMentor is static. What if we want to say hello to a different mentor? We would have to change the code too! This is easy in our tiny application but for "real" applications this might be more difficult.
Instead, wouldn't it be good if we could change which mentor we are saying hello to every time we render the component? We could reuse the HelloMentor component for different mentor names. This is what props are for.
What are Props?
Props are what we use in React to pass "arguments" to components. They are very similar to arguments in functions. You can "pass" props to components and you can use those props within a component.
First let's look at passing props to your components (interactive example):
<Mentor name="Mozafar" />
Props are key-value pairs. In this example, the key is name and the value is the string 'Mozafar'. We can pass as many props as we like to a component.
We don't have to use strings; we can use any valid JavaScript data like numbers, arrays and objects. In JSX you can use curly braces {} to inject data that is not a string:
<Mentor age={30}>
Now look at using props that we have passed to a component (interactive example):
function Mentor(props) {
  console.log(props);
  return <span>{props.name}</span>;
}
React gives you access to props in the first argument to the component function. We can inject props into our component using curly braces.
The props variable is a normal object with key-value pairs that match what was passed to the component. It is a variable and it can be used like any other variable. That includes injecting props into attributes:
<div id={"mentor-id-" + props.id}>{props.name}</div>
Or calculating new values:
<div>{props.age + 1}</div>
Exercise I (estimate: 20 min)
In this exercise, we'll move the variables in Logo, BestPokemon and CaughtPokemon to the App component. Then we'll make App pass those variables as props to the sub-components. Your app should still look the same in your browser as Exercise H.
- Using the
pokedexReact app that you created earlier, open theApp.jsfile. - Pass a prop
appName="Pokedex"to theLogocomponent. - Now open the
Logo.jsfile. - Delete the
appNamevariable. What do you see in your web browser? Why? - Change the
Logofunction to access the first argument and call itprops. Useconsole.logto inspect thepropsvariable. - Change the usage of
appNamein the<h1>to beprops.appNameinstead. Does this fix the problem? Why? - Now open the
BestPokemon.jsfile. - Copy the
abilitiesvariable and then delete it fromBestPokemon.js. - Paste the
abilitiesvariable intoApp.js. - Pass the
abilitiesvariable as a prop toBestPokemonfromApp.js. - In the
BestPokemon.jsfile replace the existing usage ofabilitieswith theabilitiesprop. You should still see the Pokemon ability names in your web browser. - (STRETCH GOAL) Repeat the process with the
datevariable in theCaughtPokemon.jsfile.
Credits
Inspiration & examples for this module were taken from Kent C. Dodd's Beginner's Guide to ReactJS course.
PD (Building confidence)
Session objective: This session will explore the confidence and imposter syndrome concepts.
Confidence plays an important life in a person's professional life. It’s not easy to work on it and improve it, especially in a competitive environment. So, it’s important to identify one’s area for improvement. Weak self-confidence can show through having an imposter syndrome and negative self-comparison. It’s important to know yourself enough to understand what causes you to feel like an imposter and how to overcome those feelings.
Exercise objective: To learn about confidence, it’s misconceptions and imposter syndrome There are some misconceptions about confidence, especially it being confused with being showy or arrogant and thinking that it’s a skill that can’t be improved.
Below are some scenarios, try to identify which ones are a misconception, which ones show confidence and which indicate having imposter syndrome:
- Asking your boss for a raise - you’ve worked in the company for years, have been selected as employee of the year but still haven’t received a raise
- You get assigned a task by your boss who knows your capabilities well and you feel like it would be better if one of other coworkers did it or at least helped you with it
- Not agreeing with your coworkers about certain work - sharing your opinion, explaining your own views/doubts on the topic
- Presenting your ideas and thoughts on certain projects to your co-workers who have been employed in the company much longer than you
- After finishing a project in pairs your coworker takes more credit for it than deserved and you let them, thinking “ah it’s ok, maybe sometimes they have worked more than me”
- Having a meeting with your boss and explaining you should be able to come to work later than the rest of the employees because you work harder than the rest of them
- Asking your boss to give you a better position at the workplace because you have more experience and knowledge than your coworkers
- Not following the official schedule because you have a better plan how to reach the goal of a project
- After encountering the problem and trying to solve it for a couple of days you ask a colleague for help and they call you incompetent
- You see your co-worker do something bad and wrong but you don’t say anything as you don’t think it’s your place
Exercise objective: To role-play the conversations and practice skills to gain confidence
Work in pairs. Choose one (or more if you can) of the following scenarios and practice your abilities to gain confidence in difficult positions.
- You just started working in the company. You work on a project with your co-worker who is not satisfied with anything that you do and is also sometimes rude with how little experience you have. The co-worker is talking rudely to you and does not take you seriously. Your challenge is to approach this co-worker in a professional manner and try to find the middle ground since you have to finish the project.
- You play the role of manager and you are responsible to give your employee a performance review. You would like them to improve their performance if they want to get a salary bonus. However, the employee already thinks they’ve done a lot since they’ve been working more hours than the rest and have finished more projects than any of them in one year.
- A customer comes to a company, being very upset about the product, claiming the product is not functioning properly. However your role is to show the customer the product does work correctly, they just don’t know how to use it in the right way.
Wrap up
What is imposter syndrome?
Imposter syndrome is having doubts about your abilities, feeling unwanted in the situation/area as if you don’t belong and thinking less capable than you are. It often feels like having anxiety, insecurities and not being able to perform at the level you are usually capable of. You feel discouraged by the achievements of the people around you and are unable to experience the full joy of your own success.
It’s important to be confident so you can:
- be assertive
- do more (challenging) work
- communicate more effectively
- push yourself to step out of your comfort zone
- always stay true to yourself
- accept praise for your work
- know your weaknesses and strengths
Coursework
Follow to view the coursework for this lesson.
Feedback
Please spend two minutes reviewing this lesson to help us improve it for the future. This feedback will be shared with volunteers.