React - Week 3
Click here to see the Learning Objectives for this lesson.
Recap
Last week we looked at using props and state to create React components that change with user input (interactive example):
import React, { useState } from "react";

function Counter() {
  const [count, setCount] = useState(0);

  function increment() {
    setCount(count + 1);
  }

  return (
    <div>
      <p>You clicked {count} times</p>
      <button onClick={increment}>Click me</button>
    </div>
  );
}

export default Counter;
Fetching Data in React
Often when you create a React app, you will want to fetch data from an API and display it inside your components. How do we do this in React?
You might think that we could just fetch the data in the component like this, but unfortunately it won't work (interactive example):
This code won't work!
function MartianPhotoFetcher() {
  let imgSrc = null;

  fetch(
    `https://api.nasa.gov/mars-photos/api/v1/rovers/curiosity/photos?earth_date=2015-6-3&api_key=DEMO_KEY`
  )
    .then((res) => res.json())
    .then((data) => {
      imgSrc = data.photos[0].img_src;
    });

  console.log(`The image src is ${imgSrc}`);
  return <img src={imgSrc} />;
}
This is because React is synchronous, while fetch is asynchronous. If we look in the console, we'll see that the imgSrc will always be null when we try to render it. React will try to render before fetch has had time to get the data from the API.

We need a way of running the fetch call after we have rendered for the first time, so that it is not racing against React updating the DOM. Then once we have got the data back we can use state to tell React to re-render with the new data.

The way we do this is with another Hook, provided by React. This one is called useEffect.
Importing useEffect
Just like useState, we will import useEffect into our file like this (interactive example):
import React, { useEffect } from "react";

console.log(useEffect);
If we look in the console, we'll see that useEffect is also a function like useState.
Often, we will need to use useState and useEffect together. They are imported together like this:
import React, { useState, useEffect } from "react";
Using useEffect
Now let's look at how to use the useEffect Hook (interactive example):
function MartianPhotoFetcher() {
  useEffect(() => {
    fetch(
      `https://api.nasa.gov/mars-photos/api/v1/rovers/curiosity/photos?earth_date=2015-6-3&api_key=DEMO_KEY`
    )
      .then((res) => res.json())
      .then((data) => {
        console.log(data);
      });
  }, []); // Always remember to put an empty array here!

  return <div>Hello useEffect!</div>;
}
The useEffect Hook takes two arguments:
- A callback function, where we can put our
fetchcall. In this example, we're fetching some data from the NASA API! 🚀 - An array, which we'll look at later but is very important that you don't forget it!
When writing your useEffect, write the "skeleton" first, then fill in the callback function later.
// Write this bit first!
useEffect(() => {
  // Write this bit later!
}, []);
You might have noticed that we still haven't rendered the data from the API. We now need to tell React to re-render once we get the data. This sounds like a job for state!
Let's look an example of how we can use state and useEffect to do this (interactive example):
function MartianPhotoFetcher() {
  const [marsPhotoData, setMarsPhotoData] = useState(null);

  useEffect(() => {
    console.log("Fetching data from NASA");

    fetch(
      `https://api.nasa.gov/mars-photos/api/v1/rovers/curiosity/photos?earth_date=2015-6-3&api_key=DEMO_KEY`
    )
      .then((res) => res.json())
      .then((data) => {
        setMarsPhotoData(data);
      });
  }, []);

  if (marsPhotoData) {
    return <img src={marsPhotoData.photos[0].img_src} alt="Martian surface" />;
  } else {
    return null;
  }
}
The timeline of this component is now what we wanted at the start:
- The component renders for the first time. Notice that we are returning
nullhere: if a component returnsnull, then React will render nothing on-screen - After rendering, the
useEffectcallback is run, so it fetches data from the NASA API - When the response is received, we update the state
- This causes a re-render so that we can show the data on-screen
You might notice that even though we re-rendered, we did not run the useEffect a second time. The way we've set it up, useEffect will only run after the first time a component renders. We'll look at controlling this in more detail later.
Exercise A (estimate: 20 min)
In this exercise, we'll fetch some data about a Pokemon's moves from the Pokemon API and render it a component:
You should complete the following steps:
- Open the
pokedexReact application again. - Create a new file
src/PokemonMoves.js, and copy/paste the code from this CodeSandbox. - Render the
PokemonMovescomponent inside theAppcomponent (underneathCaughtPokemon). - Take a few minutes to read the code in the new
PokemonMovescomponent. Discuss with another trainee why you think it doesn't work. - Create a new state variable called
pokemonDataand initialise it tonull.Click here if you are stuck.
Check last week's lesson for a reminder on creating state variables. - Now add a
useEffectcall, but leave the callback function empty for now. Make sure you remember to add the empty array after the callback function. - Inside the
useEffectcallback, call thefetchfunction with this URL:https://pokeapi.co/api/v2/pokemon/1/. - Add a
.thenhandler into thefetchfunction (remember this needs to come immediately after thefetchcall) which converts the response from JSON (hint:.then(res => res.json())). - Add a second
.thenhandler after the one we just added, where the callback function will receive an argument calleddata. - Within the second
.thencallback function, log out the data that we just received (hint:console.log(data)). Inspect the data in the dev tools console. Is there any interesting data? (Hint: think about what the component is trying to render). - Still within the second
.thencallback, set thepokemonDatastate to be thedataobject we received from the API. - What happens in your browser? Do you understand why? If not, discuss it with another trainee. If you are both stuck, ask a Teaching Assistant.
Conditional rendering
In the MartianPhotoFetcher component above, we wrapped our JSX inside an if / else statement. This is common practice in React, as it allows us to show something different depending on the situation (for example if there is no data to display, show the user something else instead).
You may also see this done in 2 other ways:
The ternary operator ? :
The ternary operator follows this structure condition ? outputIfTrue : outputIfFalse (interactive example):
return (
  <div>
    {marsPhotoData ? (
      <img src={marsPhotoData.photos[0].img_src} alt="Martian surface" />
    ) : (
      <span>Loading...</span>
    )}
  </div>
);
The double ampersand &&
The double ampersand && is used when you don't have an else. The implication is that when the condition is not fulfilled, nothing will render (interactive example):
return (
  <div>
    {marsPhotoData && (
      <img src={marsPhotoData.photos[0].img_src} alt="Martian surface" />
    )}
  </div>
);
You'll notice in the && example above, we do not render a 'Loading...' message, because there is no alternative output (no else case).
Exercise B (estimate: 10 min)
In this exercise, we'll change the PokemonMoves component to use a ternary operator. Your app should still look the same in your browser as Exercise A.
- Open the
pokedexapplication and thesrc/PokemonMoves.jsfile. - Change the
if/elsestatement in your JSX to use the ternary operator (condition ? outputIfTrue : outputIfFalse) instead.
The Circle of Life
We now know how to fetch data and render it in our React applications. However, there was a problem with the method that just learned. To understand this problem we first have to understand the lifecycle of a component.
Let's take a look at an example:
Exercise C (estimate: 10 min)
- Open this CodeSandbox.
- Take 5 minutes to read the code.
- Click the "Fetch image for 2019" button. If you're feeling confident: predict what is going to happen before you click the button.
- Now click the "Fetch image for 2020" button. What did you expect to happen? What actually happened? Can you explain why?
Together let's "play computer" to break down exactly what is happening with these components:
- When the page loads, the
Appfunction component is called - It doesn't have any
datestate already, so we initialise it to an empty string ("") withuseState - It renders the 2 buttons, but because
dateis an empty string, it does not render theMartianImageFetchercomponent. Insteadnullis returned, which means that nothing is rendered
  function App() {
    const [date, setDate] = useState("");

    ...

    return (
      <div>
        <button onClick={handle2019Click}>Fetch image for 2019</button>
        <button onClick={handle2020Click}>Fetch image for 2020</button>

        {date ? <MartianImageFetcher photoDate={date} /> : null}
      </div>
    );
  }
- When we click the "Fetch image for 2019" button, the
handle2019Clickclick handler is called - The state is set by
setDateto be"2019-01-01", and a re-render is triggered - The
Appfunction component is called again - This time,
useStateremembers that we havedatestate and it is set to"2019-01-01"
  function App() {
    ...

    function handle2019Click() {
      setDate("2019-01-01");
    }

    ...

    return (
      ...
      <button onClick={handle2019Click}>Fetch image for 2019</button>
      ...
    );
  }
- Now
Appdoes renderMartianImageFetcherand passes thedatestate as a prop namedphotoDate - The
MartianImageFetcherfunction component is called for the first time useStateknows that we haven't got anyimgSrcstate so initialises it tonull- We queue an effect, which will run after we render for the first time
- Because the
imgSrcstate is set tonull, we returnnull. This means that nothing is rendered
  function MartianImageFetcher(props) {
    const [imgSrc, setImgSrc] = useState(null);

    useEffect(() => {
      ...
    }, []);

    if (!imgSrc) {
      return null;
    } else {
      return <img src={imgSrc} />;
    }
  }
- Now that the component has rendered for the first time, the effect is run
- A
fetchrequest is made to the NASA API - When the request data comes back, we set the
imgSrcstate to a piece of the data, which triggers a re-render
  function MartianImageFetcher(props) {
    ...

    useEffect(() => {
      fetch(
        `https://api.nasa.gov/mars-photos/api/v1/rovers/curiosity/photos?earth_date=${
          props.date
        }&api_key=gnesiqnKCJMm8UTYZYi86ZA5RAnrO4TAR9gDstVb`
      )
        .then(res => res.json())
        .then(data => {
          setImgSrc(data.photos[0].img_src);
        });
    }, []);

    ...
  }
- The
MartianImageFetcherfunction component is called again useStateremembers that theimgSrcstate is set to the data from the API- This time, we do not queue an effect. We set up
useEffectwith an empty array ([]), which means that we only run after the first render - We do have
imgSrcstate set, so we render the image using the data from the API 🎉
  function MartianImageFetcher(props) {
    const [imgSrc, setImgSrc] = useState(null);

    ...

    if (!imgSrc) {
      return null;
    } else {
      return <img src={imgSrc} />;
    }
  }
Phew! That was a lot of work just to render an image! But we're not quite done yet, we still need to find out what happens when we click the "Fetch image for 2020" button:
- In the
Appcomponent, thehandle2020Clickclick handler is called - The
datestate is set to"2020-01-01"and a re-render is triggered - The
Appfunction component is called again and thedatestate is set to"2020-01-01" - The
dateprop that is passed toMartianImageFetcheris different which means that it has to re-render
  function App() {
    ...

    function handle2020Click() {
      setDate("2020-01-01");
    }

    ...

    return (
      ...
      <div>
        ...
        <button onClick={handle2020Click}>Fetch image for 2020</button>
        ...
        {date ? <MartianImageFetcher photoDate={date} /> : null}
        ...
      </div>
      ...
    );
  }
- In the
MartianImageFetchercomponentuseStateremembers that we already hadimgSrcstate. It is set to the image from 2019 - Again, we do not queue the effect because this is a re-render and
useEffecthas been passed an empty array[] - Because
imgSrcstate has been set previously we render the image from 2019
  function MartianImageFetcher(props) {
    const [imgSrc, setImgSrc] = useState(null);

    useEffect(() => {
      ...
    }, []);

    return <img src={imgSrc} />;
  }
Exercise D (estimate: 10 min)
- Did you spot where the bug was? Discuss with a group of 2 - 3 trainees where you think the bug is.
- Report back to the rest of the class where you think the bug happened.
Click here to reveal the answer!
The key that the useEffect in MartianImageFetcher is only run once. This is because we told React that the queue should be queued on the first render only. However, as we saw, sometimes you need the effect to run again when some data changes. In this case the date prop, changed from "2019-01-01" to "2020-01-01", meaning that we have to fetch data different data. We call this a dependency of the effect. Any variables which are used inside the useEffect callback function are dependencies.
useEffect dependencies array
To solve this problem, we can tell React to queue the effect on the first render and when a dependency changes. We do this by adding the dependency variable to the array (interactive example):
function MartianImageFetcher(props) {
  const [imgSrc, setImgSrc] = useState(null);

  useEffect(() => {
    ...
  }, [props.photoDate]);

  ...
}
Now when the photoDate prop changes, React knows that the effect must be run again, this time with the 2020 date. Because of this behaviour, the second argument to useEffect is called the dependencies argument. We use it whenever we have something in our effect function that depends on a variable outside of the effect function.
Here's a diagram showing when the useEffect callback will be run:
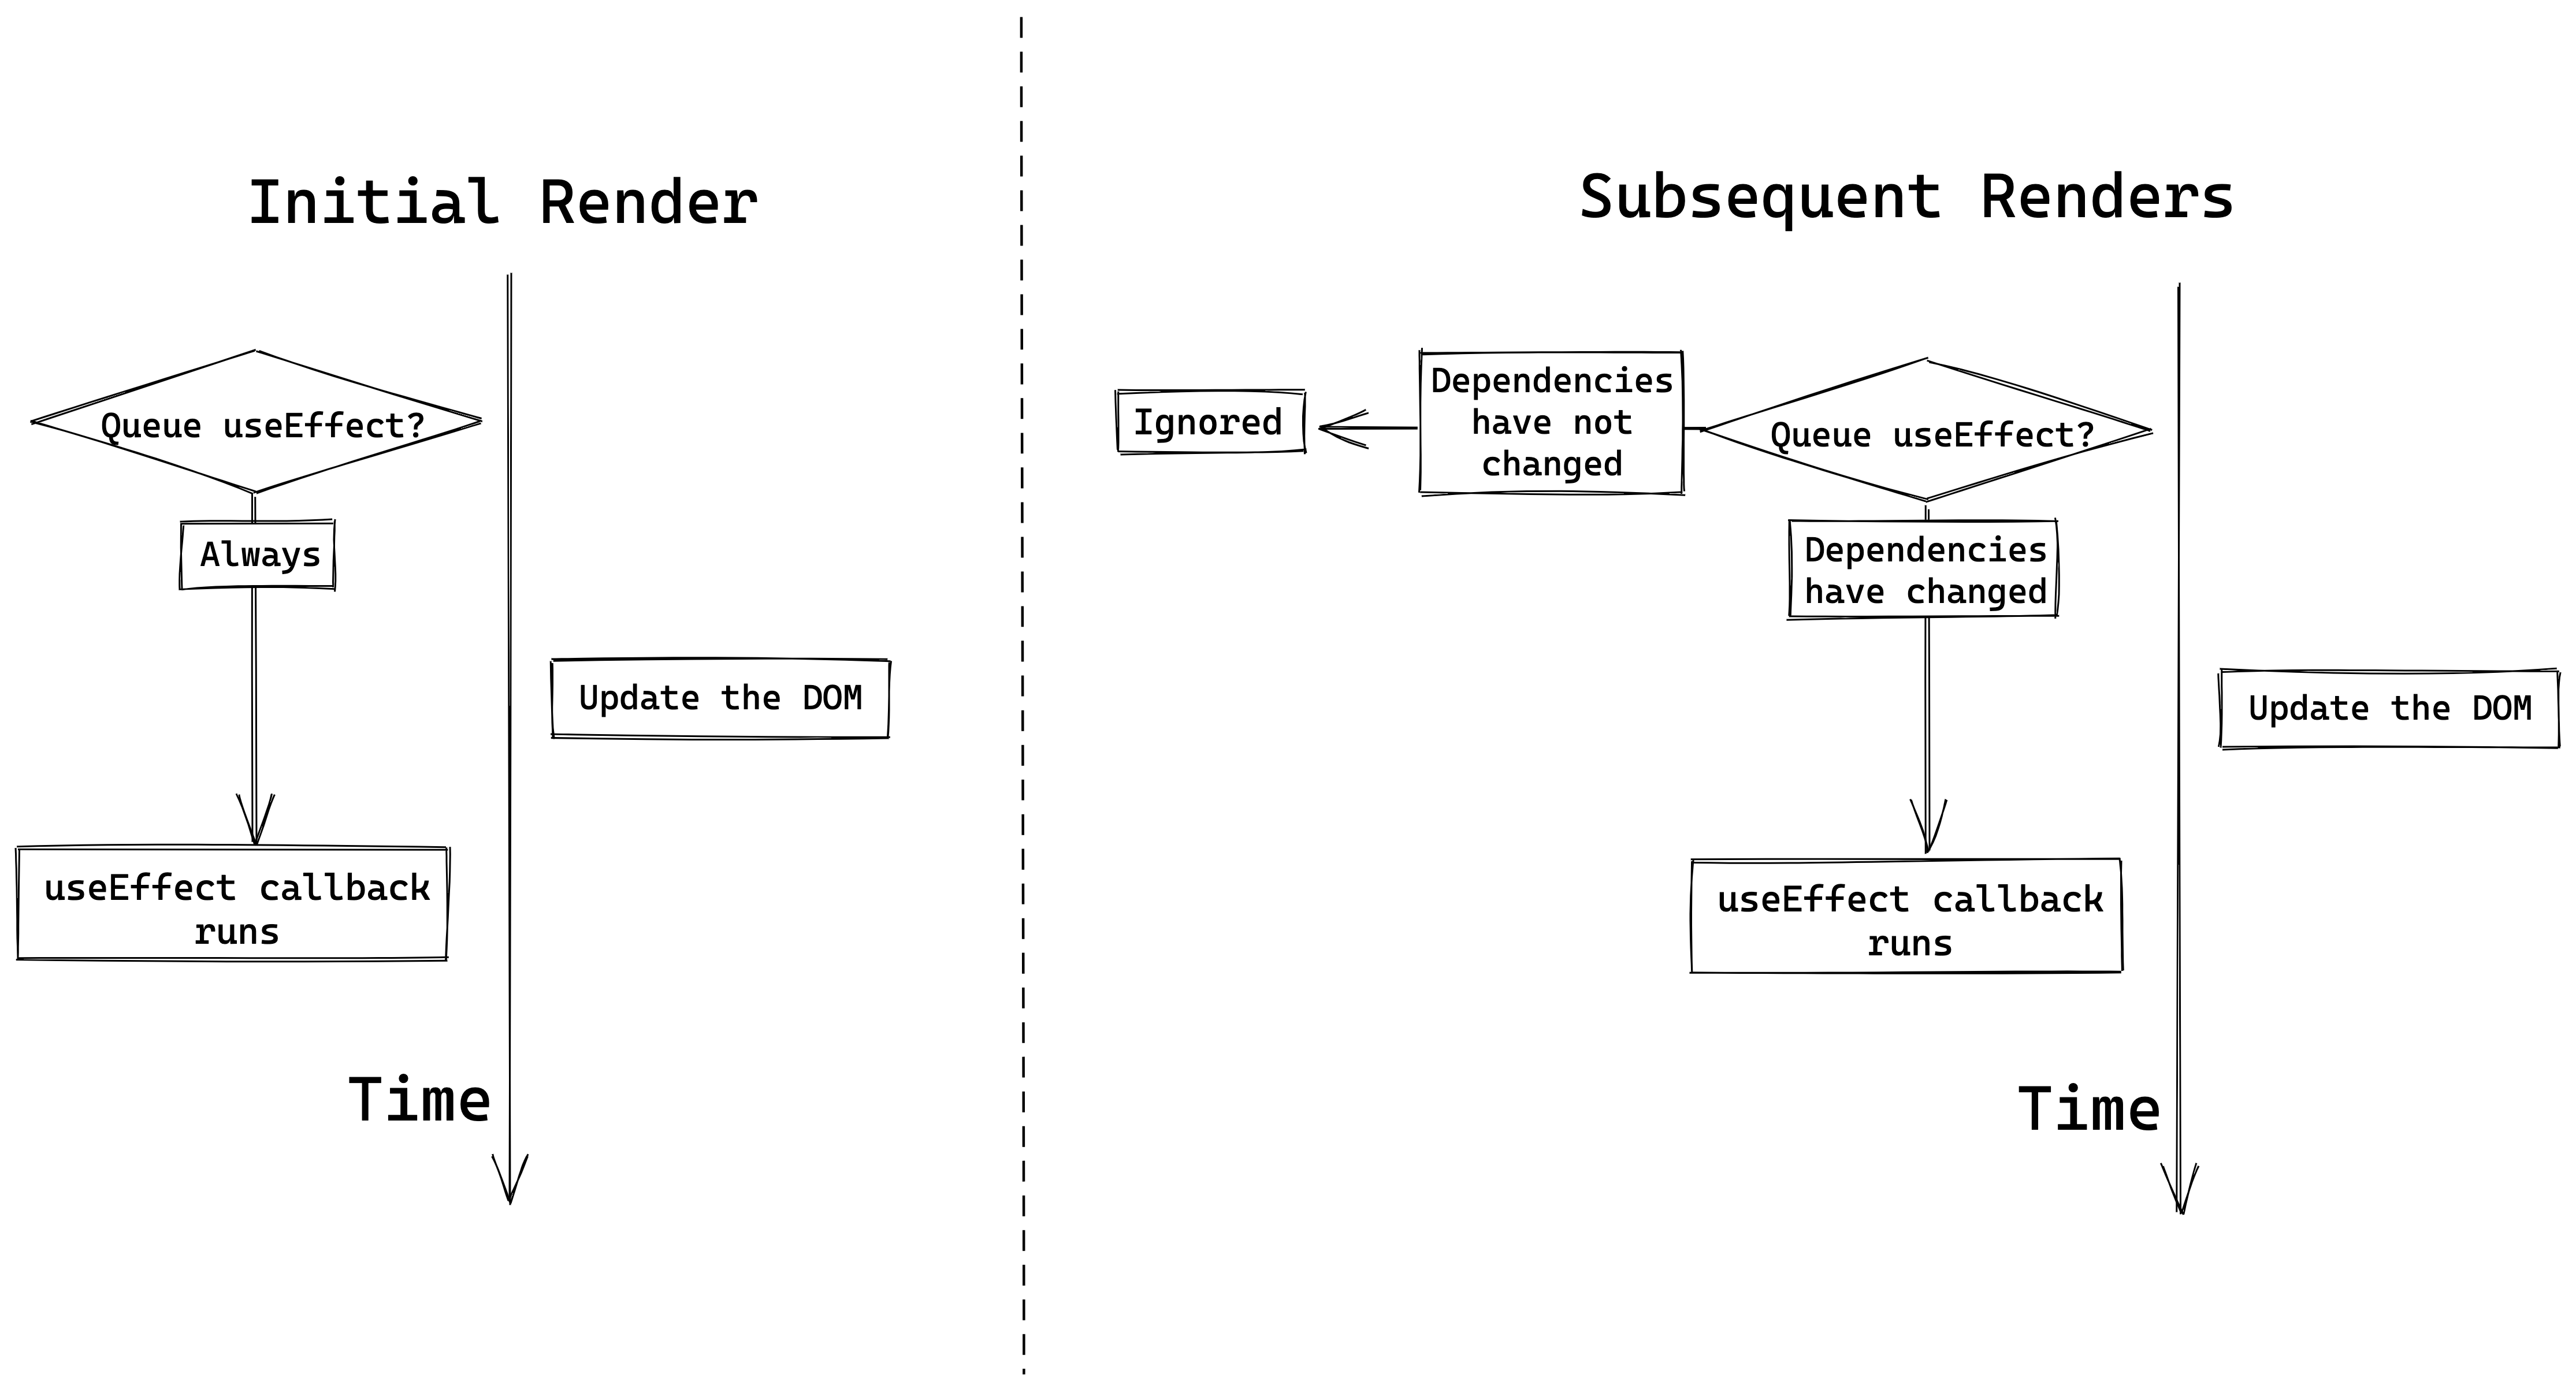
To help you understand this better, try "playing computer" again, but this time think about what happens when we use [props.photoDate] for the dependencies argument. Think carefully about what changes with step 6 after we click the 2020 button.
Exercise E (estimate: 15 min)
In this exercise, we'll add some buttons which allow you to select which Pokemon's moves we will fetch from the Pokemon API:
- Open the
pokedexReact application. - Create a new file
src/PokemonMovesSelector.js. Copy/paste the code from this CodeSandbox into the new file. - Open
src/App.jsand replace thePokemonMovescomponent with thePokemonMovesSelectorcomponent (remember to update theimporttoo!) - Take a few minutes to read what the
PokemonMovesSelectorcomponent does. If you have questions, ask a Teaching Assistant to help. We won't need to make any more changes to this component. - Open the
PokemonMovescomponent again. Change the URL to use backticks (`...`) instead of double-quotes ("..."). Then replace the hard-coded number 1 with${props.pokemonId}. What will this do?Click here if you don't know
The URL will contain thepokemonIdinstead of always fetching the Pokemon with id of 1 - Open your browser and find where the
PokemonMovesSelectorcomponent is rendered. Before you click the buttons, think about what you expect will happen. Then click the "Fetch Bulbasaur" button to find out what actually happens. - Refresh the page. What happens now if you click the "Fetch Bulbasaur" button, then click the "Fetch Charmander" button? Is this what you expected? Discuss with another trainee why this happens.
- Fix the bug by adding
props.pokemonIdto theuseEffectdependencies array inPokemonMoves. Remember that you can test if the bug still happens by refreshing the page, clicking one of the buttons, then the other button. |
ESLint rules for React Hooks
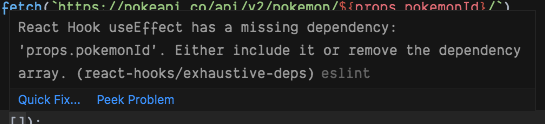
As you may have noticed, VSCode highlighted the empty dependencies array when you changed the URL passed to fetch in PokemonMoves.
This is because your React application is using the rules from eslint-plugin-react-hooks, a package created by the developers who make React. It helps you to find bugs in React Hooks code by highlighting places where you might be missing dependencies.
If you see a red squiggly line underneath your useEffect dependencies array, you can hover your mouse over and it will tell you which variable is missing so you can add it to the dependencies array. Here's an example:
Working with forms in React
Modern web applications often involve interacting with forms such as creating an account, adding a blog post or posting a comment. This would involve using inputs, buttons and various form elements and being able to get the values entered by users to do something with it (like display them on a page or send them in a POST request). So, how do we do this in React?
Controlled component pattern
A popular pattern for building forms and collect user data is the controlled component pattern. A pattern is a repeated solution to a problem that is useful in multiple similar cases. Let's have a look at an example (interactive example):
function SimpleReminder() {
  const [reminder, setReminder] = useState("");

  function handleChange(event) {
    setReminder(event.target.value);
  }

  return (
    <form>
      <input
        type="text"
        placeholder="Some reminder"
        value={reminder}
        onChange={handleChange}
      />
      <p>Today I need to remember to... {reminder}</p>
    </form>
  );
}
We're controlling the value of the input by using the value from the reminder state. This means that we can only change the value by updating the state.
It is done using the onChange attribute and the handleChange function which is called every time the input value changes (typically when a new character is added or removed).
If we didn't call setReminder in the handleChange function, then the input's value would never change and it would appear as if you couldn't type in the input! Finally, the value we keep in the reminder state is displayed on the screen as today's reminder.
In addition, instead of just saving the value of the input in the state, we could have also transformed the string before we set it with setReminder, for example by calling toUpperCase() on the string.
Exercise F (estimate: 15 min)
In this exercise, we'll create a new component where you can type in the name of a Pokemon city and see it on screen.
Welcome to the city of
- Open the
pokedexReact application. - Create a new file
src/PokemonCity.js. Copy/paste the code from this CodeSandbox into the new file. - Open the
src/App.jsfile and render the newPokemonCitycomponent (underneathPokemonMovesSelector). - Take a few minutes to understand what the
PokemonCitycomponent does. - Add an
<input type="text" />element above the<p>element. - Set the
valueattribute of the<input>to thecitystate. - Create a function within the component called
updateCity. Pass this function to theonChangeevent handler. - Change the
updateCitycomponent so that it has a parameter namedevent. - Add a
console.logto inspect the value ofevent.target.value. What happens when you type in the input? - Using
setCity, update the city state to what was typed in the input box.
Form with Multiple Fields
Let's have a look at a more complex example where we want to build a form to let users enter information to create a personal account (interactive example):
function CreateAccountForm() {
  const [username, setUsername] = useState("");
  const [email, setEmail] = useState("");
  const [password, setPassword] = useState("");

  function handleUsernameChange(event) {
    setUsername(event.target.value);
  }
  function handleEmailChange(event) {
    setEmail(event.target.value);
  }
  function handlePasswordChange(event) {
    setPassword(event.target.value);
  }

  return (
    <form>
      <div>
        <input
          type="text"
          name="username"
          placeholder="Username"
          value={username}
          onChange={handleUsernameChange}
        />
      </div>
      <div>
        <input
          type="text"
          name="email"
          placeholder="Email"
          value={email}
          onChange={handleEmailChange}
        />
      </div>
      <div>
        <input
          type="password"
          name="password"
          placeholder="Password"
          value={password}
          onChange={handlePasswordChange}
        />
      </div>
    </form>
  );
}
We now have three different inputs named username, email and password. There is a corresponding state variable and change handler function for each value.
Exercise G (estimate: 15 min)
In this exercise, we will change the CaughtPokemon component so that you can type in the name of a Pokemon that you caught and it will show in the list:
Caught 0 Pokemon on 11/4/2023
- Open the
pokedexReact application again and open thesrc/CaughtPokemon.jsfile. - Render an
<input>before the<button>(hint:<input type="text" />). - Create a new state variable called
pokemonNameInputand initialise to an empty string (""). - Add a
valueattribute to the<input>which is set to thepokemonNameInputstate variable. (Hint:value={pokemonNameInput}) - Create a new
handleInputChangefunction within the component. - Add a
onChangehandler to the<input>that will callhandleInputChange. - Add a parameter called
eventto thehandleInputChangefunction. Set thepokemonNameInputstate variable toevent.target.value. Try typing in the<input>again. What happens now? - Change the
catchPokemonfunction to add thepokemonNameInputstate to thecaughtarray (hint: change the value that we are passing to theconcatmethod) - Open your browser, type a Pokemon name into the
<input>and click on the "Catch Pokemon" button. Do you see your new Pokemon being added to the list? - Empty the
<input>after clicking on the button. To do this, set the state ofpokemonNameInputto an empty string""after we have added it to thecaughtarray in thecatchPokemonfunction. 11: (STRETCH GOAL) Make sure the user cannot add a Pokemon to thecaughtstate if the value ofpokemonNameInputstate is empty.
Inlining event handlers
We could make our code a bit shorter if we inlined our event handlers (interactive example):
<input
  type="text"
  name="username"
  placeholder="Username"
  value={username}
  onChange={(event) => setUsername(event.target.value)}
/>
Centralising event handlers
Sometimes we need to put all of our update logic in one function, maybe because we need to validate the user's input before we set it in state.
We can use a single handleChange function, that is reused to keep track of changes for all of the form fields. To be able to tell which <input> is being updated, we check the event.target.name field. This corresponds to the name attribute on the <input> (e.g. <input name="username">).
Based on this value, we then decide which state to update (interactive example):
function handleChange(event) {
  if (event.target.name === "username") {
    setUsername(event.target.value);
  } else if (event.target.name === "email") {
    setEmail(event.target.value);
  } else if (event.target.name === "password") {
    setPassword(event.target.value);
  }
}
Form submission
So far, our form examples don't have a way of sending the user data back to the server, so that we can store it in the database.
We will be using a special submit event triggered on the <form> element. This event is triggered when the user clicks a submit button or if they hit the Enter key. Let's take a look at an example (interactive example):
function CreateAccountForm() {

  ...

  function handleSubmit(event) {
    event.preventDefault();

    console.log("Sending data to server");

    fetch("https://httpstat.us/200", {
      method: "POST",
      body: JSON.stringify({
        username: username,
        email: email,
        password: password
      }),
      headers: {
        "Content-Type": "application/json"
      }
    });
  }

  return (
    <form onSubmit={handleSubmit}>
      ...
      <button>Submit</button>
    </form>
  );
}
We set up our <form> to handle the event by passing the handleSubmit function to the onSubmit prop. If we click on the Submit button or hit Enter while focused on the form, the event is triggered and the handleSubmit function is called.
The first thing we do inside the handler function is call event.preventDefault(). This is necessary because the browser has a default action when the submit event is triggered on the form to send a GET request to the server. We prevent the default action because we will handle the event ourselves.
We can then do whatever we want with our user data! In this example, we're sending a POST request using the fetch method.
Further Reading
Container components
There is a common pattern when loading data in React applications, called container components.
Multiple fields as state pattern
There is another common pattern for handling multiple fields in a form, but it requires some JavaScript functionality that you may not have seen before.
PD (SMART Goal Setting)
Session objective: In this session we will explore how to set goals using SMART framework.
Exercise objective: To discuss goal setting process.
Discuss as a class what you understand from "setting a goal". Continue discussing the following questions:
- Why is it hard to achieve goals?
- What are the requirements to achieve a goal once it is set?
Answer key
- Goals should be specific, achievable, measurable, relevant and time-bound.
- Eliminate/pause other less important competing goals.
- Use existing habits to help you make progress towards your goals. “Pushups: Before I take my morning shower(existing habit), I will do 10 pushups.”
- Align your environment with your ambitions. Make it really easy to follow your plan to reach your goals. For example, if the goal is improving your health don't set your environment in a negative way - if you can easily find junk food in the kitchen, then eating unhealthy food will be your default choice. Set your environment in a positive way instead: If you keep a dumbbell next to your desk at work, then pumping out some quick curls is more likely to be the default decision.
Exercise objective: To get familiar with the dynamics of setting goals using the SMART framework.
As a class, use the scenario below and write a goal following the SMART framework. Start with a very simple goal and then go through all SMART criteria and apply them one by one until you have a goal that meets all those criteria.
Let’s assume your job requires MongoDB skills and you believe this is something you need to improve. The company you work for performs regular codility tests to measure skills.
Answer key Goal before meeting the criteria:
- I want to get better at MongoDB
- I will increase my knowledge in MongoDB
- I will complete 5 courses in MongoDB
- I would like to increase my knowledge in MongoDB, so I will set aside 1 hour every day to organize my workspace
Goal that meets the criteria:
- Specific: I want to complete a MongoDB course
- Measurable: I will complete a MongoDB course by measuring progress tracking my daily study hours
- Achievable: I will complete a MongoDB course first before searching for other courses. This way I can achieve this goal by making small increases in my knowledge
- Relevant: My job requires MongoDB skills, therefore I would like to increase my knowledge in MongoDB, so I will set aside 2 hours every day to learn and practice my new skills
- Time-bound: I will increase my knowledge in MongoDB in 1 week. I will set aside 2 hours each day to study and practice my new skills
Exercise objective: To become more comfortable writing SMART goals by applying the learnings to different scenarios.
Work in small groups. Go through all the scenarios below and write goals for each of them following the SMART framework.
- Your job requires exceptional stakeholder survey skills and you believe this is something you need to improve.
- Your latest health assessment didn’t go too well. You would like to improve your overall health.
- You want to publish more on Linkedin.
- You want to watch less tv and read more.
- You want to be more in control of you emotions.
Answer Key
- I will complete a stakeholder survey course in a month and following this course I will apply my learning to the next 5 surveys I conduct.
- My goal is to lose 15 pounds within the next three months so I can live a healthier lifestyle and feel better physically and mentally in my daily life and to accomplish that I am going to get at least 30 minutes of exercise three days a week using the exercise gear I have at home and cut my daily caloric intake by 25%.
- Starting next week, I will post an article on Linkedin each week for a year, culminating in fifty-two posts and increased traffic to my profile.
- I’ll spend more time reading and less time watching TV by going to a book club every week and completing one book per month for the next six months.
- I’ll meditate at least ten minutes per day, every day, for the next six months. I’ll track my meditation time with an app and will assess my results in six months.
Wrap up
What is Goal Setting?
“The act of selecting a target or objective you wish to achieve”
Having a goal is the easy part. The real challenge is willing to go through the process required to achieve your goal.
Goals are useful for setting the direction but without a plan, they will just be a wish. Systems are great for actually making progress towards achieving a given goal. If you’re a runner, your goal is to run a marathon. Your system is your running training schedule for the month.
SMART Framework
SMART is an acronym that you can use to guide your goal setting. It can be used to set both professional and personal goals.
S for Specific - Target a specific area of improvement
M for Measurable - Quantify or suggest an indicator of progress
A for Achievable - Stage what results can realistically be achieved, given available resources
R for Relevant - Determine if the goal is in alignment with your values and long-term objectives
T for Time-bound - Specify when the result(s) can be achieved
Coursework
Click here to view the coursework for this lesson.
Feedback
Please spend two minutes reviewing this lesson to help us improve it for the future. This feedback will be shared with volunteers.